How to Add and Manage VST Plugins in FL Studio
VST Plugins in FL Studio are essential tools for modern music producers. Whether you’re using synths, effects, mastering processors, guitar amps, or virtual instruments, plugins expand the creative power of FL Studio. While FL Studio already includes amazing built-in plugins, many producers rely on third-party VST2 and VST3 tools to shape their sound, mix professionally, and explore new styles.
If you’re new to FL Studio or transitioning from another DAW, understanding how to add, install, scan, organize, categorize, and manage VST plugins is crucial. Proper management ensures a smooth workflow, prevents crashes, avoids plugin duplicates, and keeps everything clean and easy to find.
This complete guide explains how to add and manage VST plugins in FL Studio step by step, including installation, plugin scans, directories, plugin database management, troubleshooting, and advanced organization tips.
What Are VST Plugins?
VST (Virtual Studio Technology) plugins are software instruments or audio effects used inside FL Studio to enhance music production.
Types of VST Plugins
- VST Instruments (VSTi)
Playable plugins like synths, pianos, drums, guitars, etc. - VST Effects (VSTfx)
Plugins that process audio:- EQ
- Compression
- Reverb
- Delay
- Saturation
- Mastering tools
VST Formats Supported by FL Studio
- VST2 (DLL files)
- VST3 (VST3 files)
- AU (Mac only, optional)
- 64-bit plugins (recommended)
Knowing these formats helps you install the right version.
How to Install VST Plugins on Windows & macOS
Before VST Plugins in FL Studio can load your plugins, you must install them properly on your computer.
2.1 Installing VST Plugins on Windows
Most installers ask for VST2 and VST3 installation paths.
Recommended VST Directories
VST2:C:\Program Files\VSTPlugins
orC:\Program Files\Steinberg\VSTPlugins
VST3:
(Automatically installed here)C:\Program Files\Common Files\VST3
Steps
- Download plugin installer
- Run installer
- Choose VST2/VST3 folder
- Finish installation
- Open FL Studio
- Scan plugins
2.2 Installing VST Plugins on macOS
macOS usually installs plugins automatically.
Default VST Locations
VST2:/Library/Audio/Plug-Ins/VST/
VST3:/Library/Audio/Plug-Ins/VST3/
AU:/Library/Audio/Plug-Ins/Components/
Steps
- Download .pkg or .dmg
- Install the plugin
- Plugins appear in default directories
- Open FL Studio
- Rescan plugins
How to Add VST Plugins Into FL Studio
Once plugins are installed on your computer, you must load them into FL Studio’s Plugin Manager.
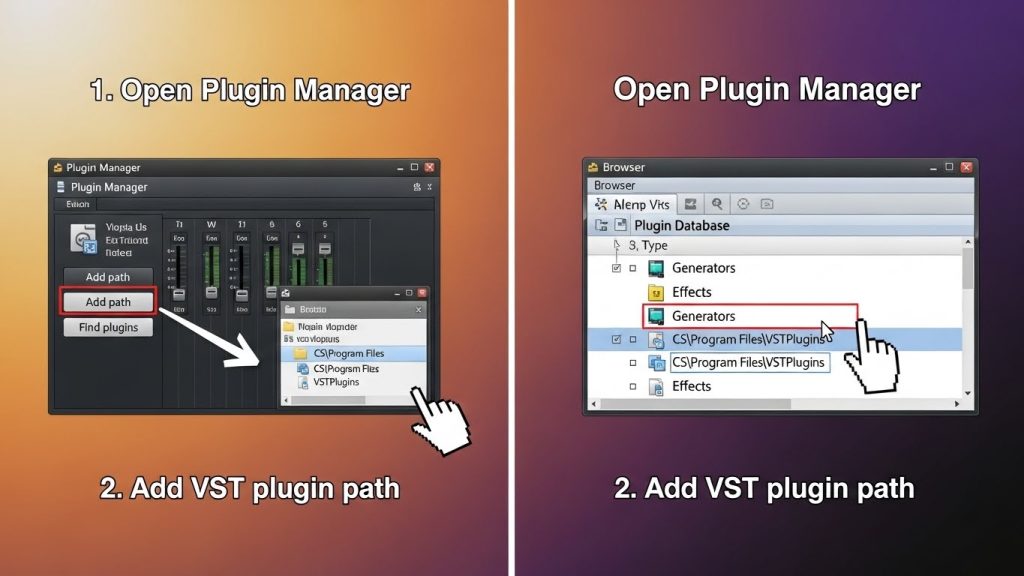
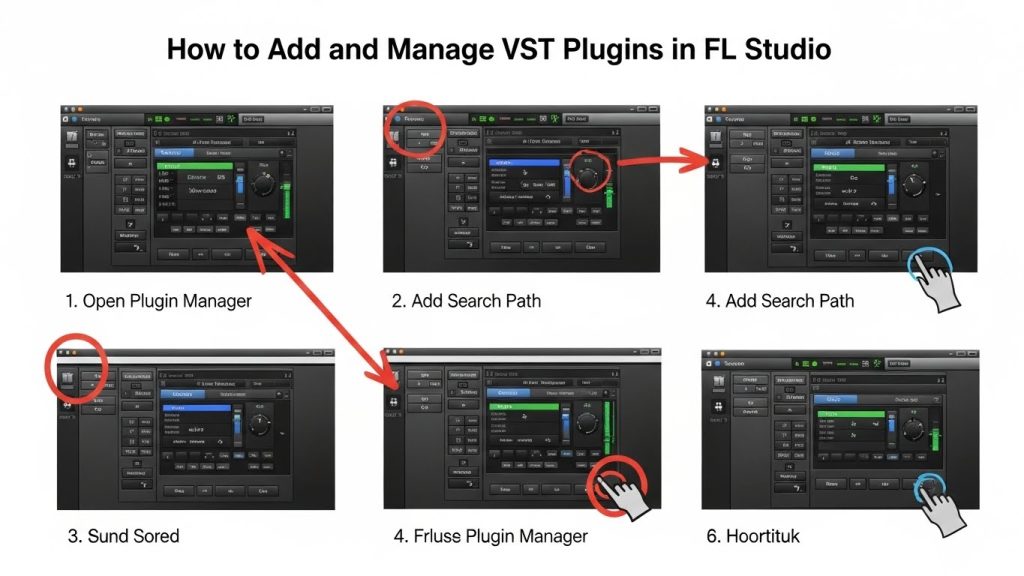
3.1 Open Plugin Manager
- Go to Options
- Select Manage Plugins
This opens FL Studio’s Plugin Manager window.
3.2 Add the Correct VST Folder (Important)
If your plugin is installed in a custom location, add the path manually:
Steps
- Click Plugin Search Paths
- Click Add Folder
- Select your VST2 or VST3 directory
- Click OK
FL Studio will now include these folders in every scan.
3.3 Scan for New Plugins
Click:
✔ Find Plugins
(or Start Scan)
FL Studio scans all your directories and lists:
- New plugins
- Updated plugins
- Removed plugins
- Plugins that fail to load
After scanning, new plugins appear in the list.
How to Load VST Plugins in FL Studio
You can load VST Plugins in FL Studio in two places:
4.1 Loading VST Instruments (Instruments/Synths)
Steps
- Channel Rack → Add
- Select your plugin from the list
- Plugin GUI opens
Works for synths, pianos, drum machines, etc.
4.2 Loading VST Effects (Mixing Plugins)
Steps
- Open Mixer (F9)
- Select a Mixer Track
- Slot → Select Plugin
- Choose your VST effect
This applies processing to audio tracks.
Managing Plugins in FL Studio
Proper VST Plugins in FL Studio management keeps your workspace organized and efficient.
5.1 Favorite Your Most-Used Plugins
To avoid scrolling through long lists:
Steps
- Open Plugin Manager
- Find plugin
- Click Star Icon
- The plugin now appears in your Favorites
Favorites make your workflow much faster.
5.2 Categorize Plugins Into Custom Folders
FL Studio allows you to create custom categories like:
- Synths
- Drums
- Mixing
- Mastering
- Guitar
- Bass
- Reverb
- Delay
- Compressors
- Free Plugins
Steps to Create Categories
- Go to:
FL Studio Browser → Plugin Database → Installed - Right-click → Open
- Create new folder categories
- Drag plugins into your new folders
Custom folders make plugin browsing much easier.
5.3 Rename or Re-Icon Plugins
FL Studio lets you rename plugins and assign icons or colors.
Steps
- Browser → Plugin → Right-click
- Edit
- Rename or change icon
- Save
This makes identification easier during complex sessions.
5.4 Block or Hide Unwanted Plugins
Some free plugins come with:
- Duplicates
- Old 32-bit versions
- Broken versions
You can hide them.
Steps
- Open Plugin Manager
- Select plugin
- Disable check mark
- Or hide from database
Keeps your list clean.
VST2 vs VST3 Plugins: What’s the Difference?
Understanding plugin formats helps you avoid duplicates.
6.1 VST2 (Older Standard)
- File extension: .dll
- Manual install paths
- Still widely used
- Sometimes duplicates with VST3
6.2 VST3 (Recommended Standard)
- Auto-installed
- More stable
- Lower CPU usage
- Better automation
- Supports resizing
- Cleaner with FL Studio
You should choose VST3 whenever available.
Adding VST Plugins to the Plugin Picker
The Plugin Picker (F8) shows plugin icons in a visual grid.
You can add custom icons for your favorite plugins.
Steps to Add Plugins
- Open Plugin Picker (F8)
- Right-click background → Add to Database
- Choose folder category
- Rename
- Add custom icon (optional)
Visual organization = faster creativity.
Troubleshooting VST Plugins in FL Studio
Sometimes plugins don’t appear, crash, or fail to load.
Here’s how to fix common issues.
8.1 Plugin Not Showing in FL Studio
Reasons:
- Wrong install folder
- Not scanned
- 32-bit plugin on 64-bit FL Studio
- Blocked by firewall
Fix
- Add correct VST folder
- Rescan with “Verify Plugins”
- Install 64-bit version
8.2 Plugin Crashing or Freezing
Reasons:
- Faulty plugin
- Low RAM
- High CPU usage
Fix
- Update plugin
- Enable Smart Disable
- Run plugin in dedicated mode
8.3 Plugin GUI Too Small or Too Large
Go to:
Plugin Wrapper → Gear Icon → Processing → Make GUI Resizable
Resize plugin window to your preference.
8.4 Plugin Missing Presets
Many synths require preset folder paths.
Fix
- Locate preset folder manually
- Set as “Default Preset Folder” in plugin settings
Best Practices for Managing Plugins in FL Studio
These habits keep your workflow clean.
9.1 Always Install 64-Bit Plugins
Avoid 32-bit versions unless absolutely necessary.
9.2 Keep Your VST Folder Clean
Do NOT use:
- Desktop
- Documents
- Random folders
Use a dedicated directory.
9.3 Name Plugins Clearly
Avoid confusing names like:
- vst3plugin123
- synth_new
- oldversion
Use simple labels:
- Serum
- Vital
- FabFilter Pro-Q
9.4 Organize Plugins by Function
Create categories such as:
- EQ
- Compression
- Reverbs
- Free Synths
- Paid Plugins
This improves speed and workflow.
9.5 Update Plugins Regularly
Updates fix:
- Crashes
- Bugs
- CPU issues
- Missing features
9.6 Backup Your VST Folder
Before formatting your PC, always back up:
- Plugin folders
- Serial numbers
- Preset banks
Understanding Plugin Wrapper Settings in FL Studio
The VST Plugins in FL Studio Wrapper provides important plugin controls.
10.1 Wrapper Toolbar
Includes:
- Oversampling
- Smart Disable
- Arpeggiator
- MIDI effects
- CPU usage monitor
10.2 Processing Tab
You can:
- Force bridge
- Use dedicated thread
- Fix latency
- Adjust plugin compatibility
These settings are essential for older or unstable plugins.
10.3 Troubleshooting Tab
Includes:
- Fix scaling
- Force high DPI
- Disable threaded processing
Useful for solving visual or crash issues.
10.4 Oversampling
Increase plugin audio quality.
Recommended:
- 2x or 4x for mastering
- 1x for light usage
How to Delete, Remove, or Uninstall Plugins
Steps
- Delete plugin files from VST folder
- Open Plugin Manager
- Rescan
- Remove from plugin database
Always clean both the folder and FL Studio.
How to Use VST Presets Efficiently in FL Studio
Many plugins come with preset banks.
Ways to Use Presets
- Load preset folders manually
- Create custom banks
- Save patterns as FL Studio presets
- Rename presets for clarity
Presets help speed up creativity.
Final Thoughts
Adding and managing VST plugins in FL Studio is one of the most important skills for any producer. Once you know how to install, scan, organize, categorize, label, and optimize your plugin setup, your workflow becomes smoother, faster, and more creative. Whether you use FL Studio for trap, EDM, hip-hop, lo-fi, or film scoring, proper plugin management will save time, prevent errors, and give you instant access to the tools you need.
By following the steps in this guide — from installation to troubleshooting, organizing favorites, using custom folders, and optimizing wrapper settings — you’ll build a clean, professional, and efficient plugin environment inside FL Studio.