How to Export High Quality Audio in FL Studio
Exporting high-quality audio is one of the most important steps in music production. You can have a clean mix, powerful drums, and a polished arrangement, but if your export settings are incorrect, the final file may sound distorted, muddy, or quiet on streaming platforms. FL Studio gives producers complete control over export parameters like bitrate, sample rate, dithering, resampling Export High Quality Audio in FL Studio, and mastering headroom to ensure your track sounds professional across all devices, speakers, and platforms.
This guide explains everything step by step — from preparing your project before export to choosing the correct WAV or MP3 settings. Whether you make hip-hop, EDM, trap, house, drill, lo-fi, cinematic, or pop, this guide will help you export the cleanest, loudest, and highest-quality audio possible using FL Studio.
Preparing Your Project Before Export
High-quality audio starts before you even reach the export window. Proper project preparation ensures your final track renders cleanly without clipping, distortion, or missing layers.
1.1 Check the Mixer Levels
Open your Mixer and make sure:
- Nothing is peaking above 0 dB
- Kick and snare have headroom
- Master track is not clipping
A good rule is to keep the loudest peak around -3 dB to -6 dB before mastering.
1.2 Disable Limiting (If You’re Not Mastering)
If you’re exporting a mix for external mastering:
- Remove or bypass Maximizer
- Remove Limiter
- Remove heavy compression on the master
This ensures clean dynamic range.
1.3 Remove Unwanted Plugins
Turn off:
- Unused effects
- Reverbs not needed
- ELABs causing noise
- Oversampling plugins if CPU is overloaded
Clean sessions produce cleaner exports.
1.4 Check Automation Clips
Make sure no automation clips:
- Mute tracks accidentally
- Drop volume unexpectedly
- Reset to zero
These issues are common in large projects.
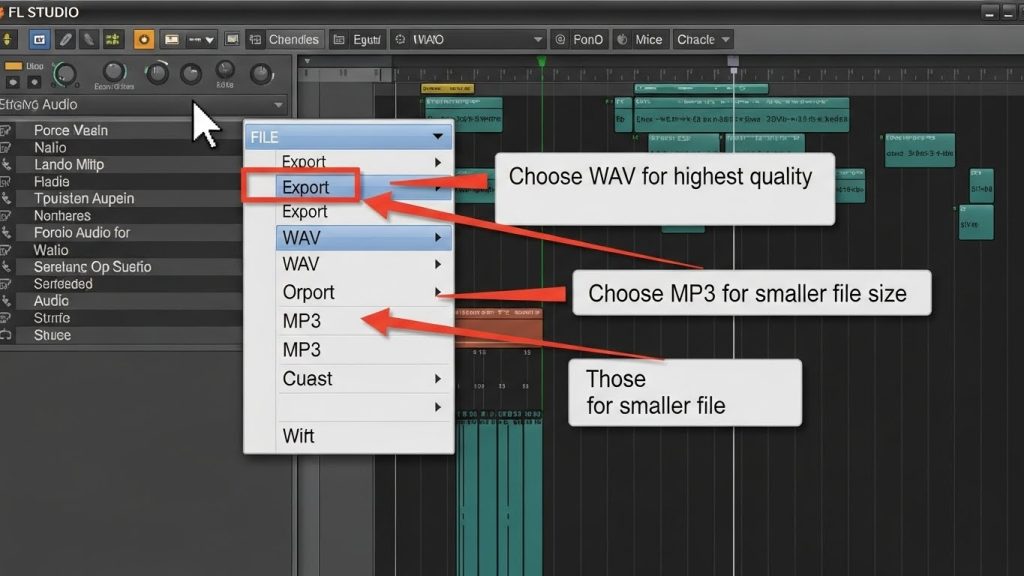
Understanding Audio Export Formats in FL Studio
Before exporting, you must choose the right format. Export High Quality Audio in FL Studio supports several file types, but two formats dominate professional workflows:
WAV – Best for Quality
- Uncompressed
- Best for mastering
- Best for distribution
- Highest clarity
- No loss of information
MP3 – Best for File Size
- Compressed
- Small file size
- Perfect for demos or sharing
- Lower quality than WAV
OGG
- Good balance between quality and size
- Not ideal for streaming platforms
FLAC
- Lossless compressed
- Slightly smaller than WAV
- Still full quality
Recommended Formats
| Use Case | Best Format |
|---|---|
| Mastering | WAV 24-bit or 32-bit |
| Spotify / Apple Music Upload | WAV 24-bit |
| YouTube Video Editing | WAV 24-bit |
| Sharing with Friends | MP3 320 kbps |
| Sending Beats to Clients | WAV + MP3 |
| Stems for Mixing | WAV 32-bit (each track) |
How to Export High Quality Audio in FL Studio (Step-by-Step)
Follow these steps to Export High Quality Audio in FL Studio your project correctly:
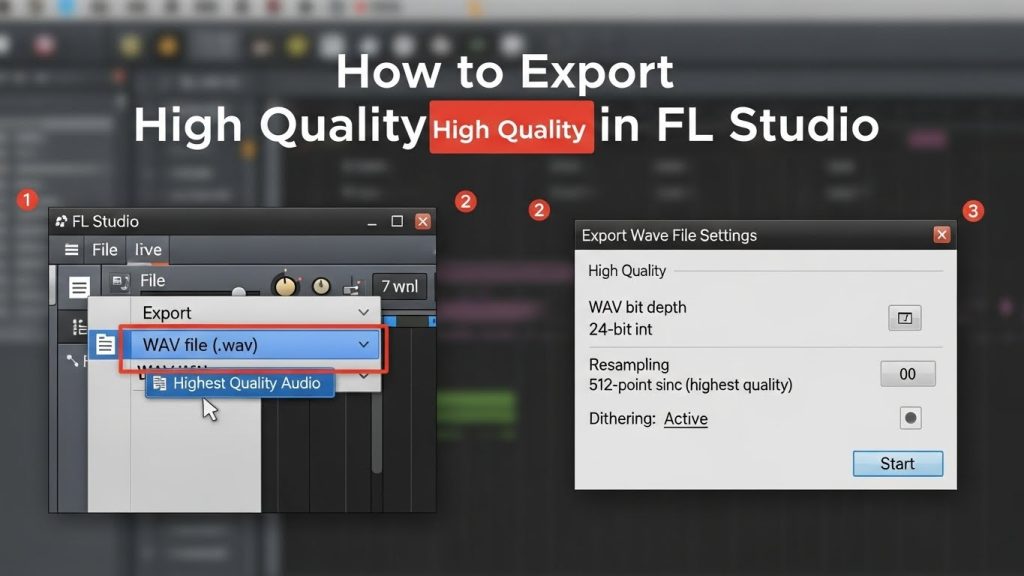
3.1 Open the Export Window
Go to:
File → Export → WAV File / MP3 File / FLAC File
Choose the folder where you want the rendered track saved.
3.2 Choose WAV for Best Quality
In the format section, select:
✔ WAV (best choice for final masters)
3.3 Select the Right Sample Rate
Sample rate affects how much detail your audio carries.
Recommended Sample Rates
- 44.1 kHz → Standard CD / streaming quality
- 48 kHz → Video, YouTube, Film
- 96 kHz → High-end mastering
Best option for most producers:
➡ 48 kHz — clear, modern, and ideal for streaming/video.
3.4 Bit Depth (Very Important)
Bit depth determines dynamic range and clarity.
Recommended Bit Depths
- 24-bit → Best balance of quality and size
- 32-bit float → Best for mastering or heavy processing
- 16-bit → Old CD standard (not recommended today)
For most producers:
➡ Choose 24-bit or 32-bit float
3.5 Enable “HQ for All Plugins”
This ensures your plugins export at the highest resolution.
3.6 Enable “Disable Max Poly”
Prevents artifacts caused by polyphony limits.
3.7 Enable “Leave Remainder”
Prevents cutting off reverb tails and delay trails.
3.8 Set Resampling Quality to 512-point or 512 HQ
This smooths out audio during export and avoids aliasing.
Best Setting:
✔ 512-sinc (best quality)
Master Track Settings for High-Quality Export
Even if your export settings are perfect, bad master track settings can ruin the final Export High Quality Audio in FL Studio file.
4.1 Use a Proper Master Chain (Optional but Recommended)
A simple, clean master chain:
- Subtle EQ
- Gentle compressor
- Limiter (for loudness)
- Soft clipper (optional)
Avoid heavy processing
Too much compression or EQ will distort your file after export.
4.2 Ensure No Clipping
Your master volume must stay below 0 dB.
- Inputs clipping = distortion
- Outputs clipping = ruined export
Keep your master around -0.5 dB after limiting.
4.3 True Peak Limiting
Use a true-peak limiter set between -0.5 dB and -1 dB for streaming compatibility.
Streaming platforms like Spotify, Apple Music, and YouTube compress audio further — so keeping safe headroom prevents distortion.
4.4 Dithering (Important for 16-bit Only)
If exporting to 16-bit, enable:
✔ Dithering
If exporting 24-bit or 32-bit:
✘ Dithering OFF
How to Export Stems in High Quality (For Mixing & Collaboration)
Stems are individual audio files for each track — kick, snare, bass, vocals, pads, etc.
Steps to Export Stems
- File → Export → WAV
- In the Render Settings → Enable:
- ✔ Split Mixer Tracks
- ✔ Full Quality
- ✔ 32-bit float
- ✔ HQ Plugins
- Export
You’ll get each sound printed separately — perfect for mixing engineers or collaborators. Export High Quality Audio in FL Studio.
Fixing Common Export Problems in FL Studio
6.1 Track Sounds Quiet After Export
Possible reasons:
- Limiter turned off
- Too much headroom
- Not enough compression
- Master output too low
Fix:
- Increase limiter ceiling
- Add 1–2 dB of gain
- Use soft clipping subtly
6.2 Distortion or Crackling in Export
Causes:
- Clipping
- Too much limiter gain
- Over-compressed drums
- Oversampling issues
Fix:
- Lower master gain
- Reduce limiter gain
- Check plugins for distortion
- Increase resampling to 512-sinc
6.3 Low-End Sounds Weak After Export
Causes:
- Incorrect EQ
- Bass phase issues
- Stereo widening on low frequencies
Fix:
- Keep bass mono
- Reduce unnecessary EQ cuts
- Avoid stereo effects below 150 Hz
6.4 High-End Sounds Harsh
Causes:
- Too much saturation
- Harsh EQ boosts
- Cheap samples
Fix:
- Gentle high-shelf, not peaking
- Reduce saturation
- Use de-essers on hats and vocals
6.5 Vocals Sound Buried or Flat
Causes:
- No mastering compression
- Wrong volume balance
- Clip gain too low
Fix:
- Add light bus compression
- Increase vocal gain
- Use presence EQ (3–5 kHz boost)
Best Export Settings for Different Use Cases
Export High Quality Audio in FL Studio.
7.1 Best Settings for Spotify, Apple Music, and Streaming
- Format: WAV
- Sample Rate: 48 kHz
- Bit Depth: 24-bit
- Dither: OFF
- True Peak: -0.8 dB
7.2 Best Settings for YouTube and Video Editing
- WAV
- 48 kHz
- 24-bit
- True Peak: -1 dB
7.3 Best Settings for Beat Selling (BeatStars, Airbit, etc.)
- WAV (24-bit)
- MP3 320 kbps
- Include tagged MP3 for previews
7.4 Best Settings for Professional Mastering
Export your mix as:
- WAV
- 48 kHz
- 32-bit float
- NO limiter
- NO clipping
- Plenty of headroom (-6 dB peak)
7.5 Best Settings for Sharing Demos
- MP3
- 320 kbps
- 44.1 kHz
Pro Tips to Improve Export Quality Dramatically
Tip 1: Use Good Samples
Bad-quality samples stay bad even after export.
Tip 2: Avoid Over-Processing
Too much EQ or compression will ruin your master.
Tip 3: Use Reference Tracks
Compare your loudness and brightness to a professionally mixed track.
Tip 4: Turn Off Normalization
It can ruin dynamics.
Always set:
✘ Normalization OFF
Tip 5: Export at the Same Sample Rate You Produced In
If your project is at 48 kHz, export at 48 kHz.
If at 44.1 kHz, export at 44.1 kHz.
Tip 6: Test Your Track on Multiple Devices
Listen on:
- Studio monitors
- Car speakers
- Headphones
- Bluetooth speakers
- Phone speakers
Great producers always check their mix everywhere.
Final Thoughts
Exporting high-quality audio in Export High Quality Audio in FL Studio is not just about pressing the render button — it’s about understanding sample rates, bit depth, mixer headroom, true-peak limiting, dithering, and mastering settings. When used correctly, FL Studio can deliver professional, clean, loud, and crystal-clear audio ready for streaming platforms, clients, collaborators, or your own releases.
By following the steps in this guide — preparing your project, choosing the right format, adjusting export settings, fixing common issues, and applying pro tips — you can confidently export tracks that maintain the full clarity of your mix. Whether you’re producing beats or full songs, these techniques will ensure every export sounds polished and professional.